Usage
How to Start
From the Windows Start menu, select and launch LINEEYE SI-VCP Setup.

Since LINEEYE SI-VCP Setup requires administrator privileges, a Windows "User Account Control" confirmation message may appear during startup. In this case, select [Yes] to continue.
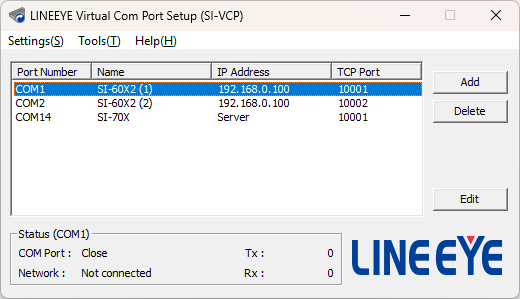
When the application starts, the "LINEEYE Virtual COM Port Setup (SI-VCP)" window will appear. From this screen, you can perform various operations such as creating new virtual COM ports and changing or deleting existing port settings.
About this Application
"LINEEYE Virtual COM Port Setup (SI-VCP)" is software used only during initial configuration or when changing settings.
Once the virtual COM port configuration is complete, you do not need to keep this application running while communicating from your applications.
If an error is displayed during startup
To run this application, the "Microsoft Visual C++ Redistributable Package" provided by Microsoft must be installed.
Please access the following official page, download, and install the "X64" (64-bit version) installer.
- Microsoft Visual C++ Redistributable Package
After installation, restart the application.
Screen Description
When you launch LINEEYE SI-VCP Setup, the following screen will appear.
You can add, edit, or delete virtual COM ports from this screen.
-
Menu Bar: The menu displayed at the top of the application allows for the following operations:
- Settings
- Add: Creates a new virtual COM port. For details: Go to Creating a Virtual COM Port
- Delete: Deletes the virtual COM port selected in the COM port list. For details: Go to Deleting a Virtual COM Port
- Edit: Edits the settings of the virtual COM port selected in the COM port list. For details: Go to Virtual COM Port Settings
- Language: Switches the display language. Japanese and English are available. The selected language will be reflected the next time the application is started.
-
Tools
-
Disconnect Socket: Disconnects the network connection of the virtual COM port selected in the COM port list.
About Disconnecting Sockets
If "Maintain communication even after closing COM port" is enabled in the Advanced Settings, the connection with the SI series unit will be maintained even after the COM port in use is closed, preventing the editing or deletion of the COM port. In such cases, execute Disconnect Socket after closing the COM port.
-
List of Firewall Allowed Ports: Displays a list of TCP ports allowed by the Windows Firewall among those used by SI-VCP for listening in server mode.
For details, refer to List of Firewall Allowed Ports. -
COM Port Communication Test: Launches a tool to test COM port communication. You can verify whether the added virtual COM port can communicate normally.
For details, refer to COM Port Communication Test.
-
- Help
- Contents: Displays documentation summarizing how to use and configure SI-VCP.
- About: Displays the version information of SI-VCP.
- Settings
-
COM Port List: Displays a list of virtual COM ports. You can check the COM port numbers, names, and destination settings.
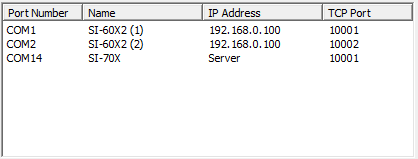
- Port Number: Displays the port number of the virtual COM port.
- Name: Displays the name used for identifying the virtual COM port.
- IP Address: Displays the destination IP address in client mode, or "Server" in server mode.
- TCP Port: Displays the TCP port number used for communication.
-
Add Button: Creates a new virtual COM port. For details: Go to Creating a Virtual COM Port
-
Delete Button: Deletes the virtual COM port selected in the COM port list. For details: Go to Deleting a Virtual COM Port
-
Edit Button: Edits the settings of the virtual COM port selected in the COM port list. For details: Go to Virtual COM Port Settings
-
Status Display: Displays the current status of the virtual COM port selected in the COM port list. You can check the connection status and the status of sent/received data.

- COM Port: Displays the open status of the virtual COM port.
- Network: Displays the network connection status with the SI series unit.
- Tx: Displays the number of data units sent from the application to the SI series unit.
- Rx: Displays the number of data units received by the application from the SI series unit.
Creating a Virtual COM Port
Click the [Add] button on the main screen, or select [Settings] -> [Add] from the menu to display the "Add New COM Port" screen.
Select the COM number you want to add from the "COM Port" drop-down menu, configure each item, and click [Save] to add the virtual COM port.
For details on the setting items, refer to About Setting Items.
About the Number of COM Ports
You can create up to 8 virtual COM ports with SI-VCP. If there are already 8 virtual COM ports, you cannot add a new COM port.
Virtual COM Port Settings
To change the settings of an existing virtual COM port, select the target virtual COM port from the COM port list and click the [Edit] button on the main screen, or select [Settings] -> [Edit] from the menu. This will display the "Edit COMx" screen.
You can also display this screen by double-clicking the target virtual COM port in the list.
Configure each item on the displayed screen and click [Save] to save the changes.
For details on the setting items, refer to About Setting Items.
About Editing
You cannot edit a COM port that is currently in use. Please close any application using the COM port before performing this operation.
Deleting a Virtual COM Port
Select the target virtual COM port from the COM port list and click the [Delete] button on the main screen, or select [Settings] -> [Delete] from the menu. A confirmation dialog will appear. Select [Yes] to delete the selected virtual COM port.

About Deletion
You cannot delete a COM port that is currently in use. Please close any application using the COM port before performing this operation.
Saving and Loading Settings
You can save (export) virtual COM port settings to a file and load (import) the saved file to apply them to another environment or restore settings.
-
Saving (Export)
Select "Export Settings" from the Basic Settings menu to save the current settings screen content to a file.
The default setting filename is saved in the format "SI-VCP_COM Port Number_Name.lvc". The "COM Port Number" and "Name" are automatically generated based on the settings at the time of saving. -
Loading (Import)
Select "Import Settings" from the Basic Settings menu to read a saved settings file and reflect it in the current settings screen.
About Saving COM Port Numbers
Since the same COM number may not be available between the environment where the file was saved and the environment where it is loaded, the COM port number is not saved in the settings file and will not be reflected when loaded.
About Saving Passwords
If a connection password or a password for the communication condition setting function is entered, it will be saved in the settings file. Please manage settings files appropriately when saving them.
Network Connection Status Notification via Control Lines
This function notifies the application of the network connection status (Established/Disconnected) with the SI series main unit as a change in the state of the virtual COM port control lines. Applications can monitor changes in control line states to perform processes according to the connection status.
You can use this function by enabling [Use network connection status notification via control lines] in the "Advanced Settings" on the screen for creating or editing a COM port.
The control lines available for this function are DCD (RLSD) and DSR. The corresponding control line changes to "Active" when a connection is established and "Non-active" when disconnected.
About Connection Status Notification
The timing of connection status change notifications may differ from the actual connection status depending on TCP keep-alive settings, network conditions, and other factors.
Communication Condition Setting Function
This function automatically reflects the COM port communication conditions from your application to the serial settings of the SI series main unit. By using an SI series unit compatible with this function, you can save the trouble of manually changing the communication conditions on the SI series unit side, allowing for easier connection with serial devices.
You can use this function by enabling [Use setting function] in the "Advanced Settings" on the screen for creating or editing a COM port.
The following settings are reflected by this function:
- Baud Rate: 300bps to 921.6kbps
- Data Length: 7bit, 8bit
- Stop Bits: 1bit, 2bit
- Parity: None, Even, Odd
- Flow Control: None, Xon/Xoff, CTS/RTS
- Xon/Xoff characters
About the Communication Condition Setting Function
- This function is compatible with SI-60X2/SI-70X. If this function is enabled on SI series models that are not compatible, the COM open operation will fail.
- After opening the COM port, it may take some time for the settings to be reflected in the main unit. During this time, serial communication data may not be processed correctly, potentially resulting in data loss or garbled characters. To ensure reliable communication, please wait a few seconds after opening the port before starting data transmission/reception.
- "Line Mode," "Echo Back Setting," and "Driver Control" for the RS-422/485 port of the SI-70X are not configured by this function. Please set the main unit appropriately in advance.
- Settings configured with this function are temporary and are not saved in the SI series main unit. If the SI series main unit is powered off or reset, it will return to its original settings.
How to Uninstall
- If "LINEEYE Virtual COM Port Setup (SI-VCP)" is running, please close the application.
- If there are any virtual COM ports open, close all COM ports by terminating the applications using them.
- From the Windows Start menu, right-click LINEEYE SI-VCP Setup and select "Uninstall," or go to [Settings] -> [Apps] -> [Installed Apps].
Find [LINEEYE SI-VCP] and select "Uninstall" from the three-dot icon next to it. - Follow the on-screen instructions to complete the uninstallation.
About Deleting COM Ports
When uninstalled, all COM ports created with SI-VCP and their settings will be deleted. If necessary, please save your settings beforehand using the settings save function.